Reducing the TTFB of Divi & Other Visual Builders When Paired with GoDaddy
Any designer or site owner that has struggled to bring their load times down should be familiar with Time to First Byte (or TTFB). It’s the amount of time it takes for a user to first begin downloading that first byte of data – and is ultimately a marker for how long it takes your server to even begin sending data your customer’s way.
Due to this being the very first step in loading a site – there’s very little you can do to help fix this using standard techniques to speed up a page – ie compressing images, reducing CSS and JS bloat, and lazy loading assets after the fold. Because of this your best bet is to focus on your server and the overall architecture and software loading your site.
In this article I’ll show you first-hand how we dealt with an annoying TTFB issue running on this very site – ultimately our combination of GoDaddy hosting and Divi’s theme builder led to us actively seeking ways to remedy the issue.
How Do I Figure Out My Site’s Time To First Byte (TTFB)?
While there are plenty of tools that can pull this information, one of our favorites is WebPageTest.org. Originally developed by a team at AOL for internal testing, this tool gives us much more usable data (and easily copy/paste-able URLs) then I’ve seen across say Google Page Speed Insights or Lighthouse.
By plugging your site into WebPageTest.org you can look directly at how long it takes their testing center to first start receiving data. I removed our Edge Caching (spoiler alert) to run a quick report to show you how a poorly performing site does:
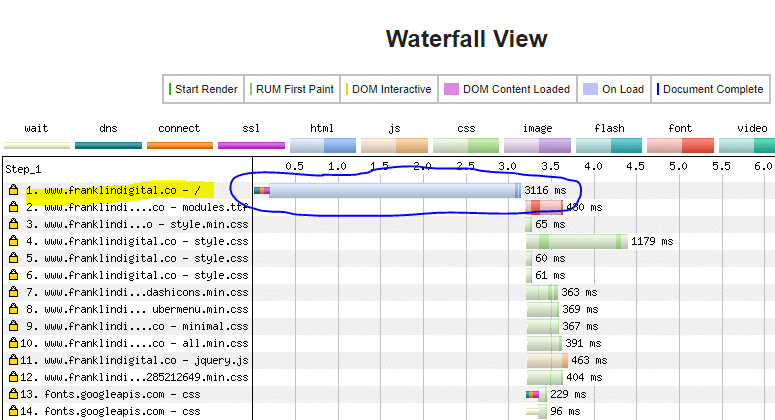
Franklindigital.co’s very sad looking TTFB. Almost 3 seconds.
You’ll not only find your website’s TTFB (circled above) in the Performance report, but you’ll also be assigned a grade from A to F. In our case – our pre-TTFB improvement did indeed land us a “F”. Below you can see our score after implementing this fix:
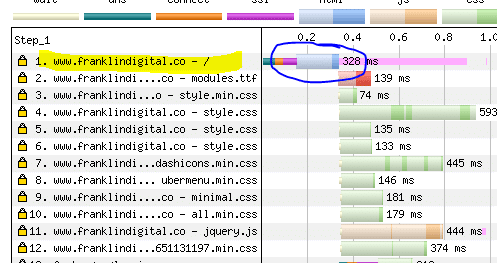
After implementing Edge Caching – a much more respectable half a second.
STEP ONE: CLOUDFLARE TO THE RESCUE
In order to fix this issue, you first need to set up a free account on the platform Cloudflare. This will allow you to access their Edge Caching which is what will ultimately fix our problem. In order to do this you’ll need to access your DNS settings and go through the process of migrating your DNS records to Cloudflare.
This is actually quite a simple process – and only involves updating your nameservers to Cloudflare, at which point it should populate the rest of your records without a problem.
Setting Up Cloudflare:
Once you enter your domain details and choose your plan (this works with the free plan) you’ll be asked to review your existing DNS records, as well as choose your method of migrating your site to their servers. The default method (changing your nameservers) is the easier of the two processes:
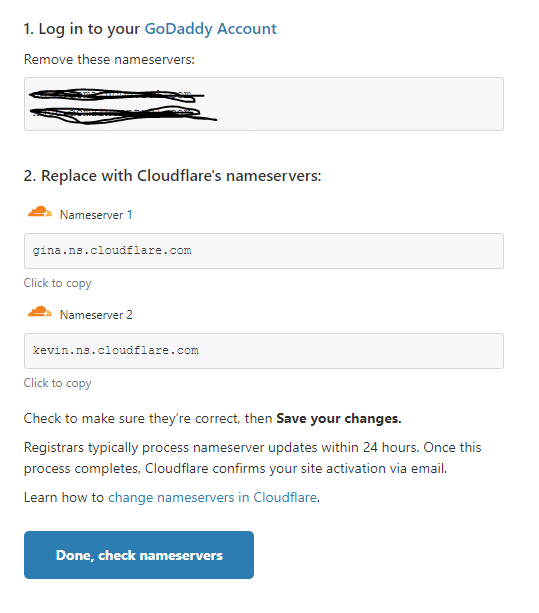
One you’ve reached this stage of the setup process – you’ll need to login to your domain registrar – which in my case is GoDaddy.
Changing Your Nameservers At Your Domain Registar
Cloudflare provides you two nameservers you’ll need to replace at your registar which will allow Cloudflare to start caching and serving your traffic from their servers. For GoDaddy users – logging into the specific domain you are trying to improve, navigating to your DNS records, and updating the nameservers below are where you’d take these steps:

This TTFB issue isn’t just specific to GoDaddy’s servers – so if you have having trouble finding your registrar you can try the following methods:
- run a “who is” report on the domain to find the registrar
- log into your hosting account and see whether your domain is registered there
- reach out to your web designer/tech team for help
Prepping Your WordPress Installation for the “Real Caching”
We are going to be implementing a very aggressive caching policy which (while improving our site load times) means we need to take some steps to prevent unneeded sections of our site from being cached.
The biggest potential issue is Cloudflare caching your WordPress Admin bar while you are viewing a published page. What this could mean is that if you are the first to visit that page (which is likely when you are updating pages) Cloudflare could cache that admin bar and show it to your users.
To remedy this, it’s important that we disable the admin bar for all viewers. Yeah it’s a pain – but I figure the three seconds each of my users is saving loading my site is a better “use of time” than me navigating to the Pages section to edit a page.
Turning Off the WordPress Admin Bar
First – log into your WordPress site and navigate to the Users section in order to edit the settings for each user. Once you edit any user that may be editing the site you’ll need to turn off the setting “Toolbar: Show Toolbar when Viewing Site”

Once this is done – you’ll no longer see the WordPress admin toolbar at the top of your screen when you are logged in and you are all ready to cache!
Creating and Activating Caching Page Rules in Cloudflare
At this point, your site should already been running through Cloudflare, but there’s still an additional step needed in order to further shrink your TTFB times. Log into your Cloudflare platform and navigate over the Page Rules section.
Here – you’ll need to create three specific page rules (with the free Cloudflare package) that should cover the needs of most basic WordPress sites running Divi.
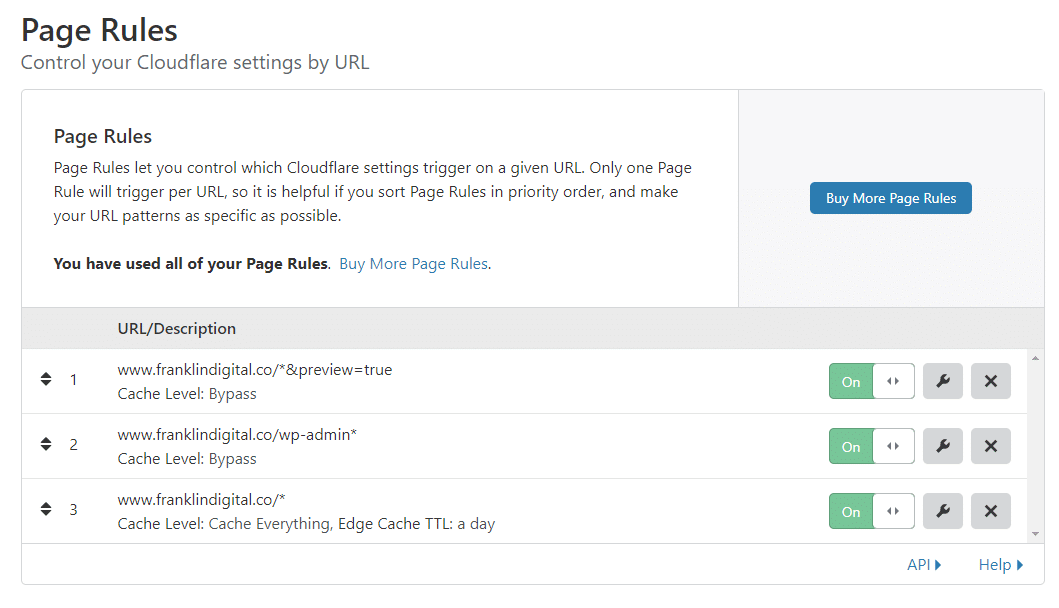
Typed out they are:
- yoursite.com/*&preview=true
- yoursite.com/wp-admin*
- yoursite.com/*
For each of these – we’ll be adding different page rules as I’ll explain below:
yoursite.com/*&preview=true
This rule prevents Cloudflare from caching your previewed pages. When creating this rule, you’ll want to select “Cache Level” and set that to “Bypass” in order to bypass all Cloudflare caching.
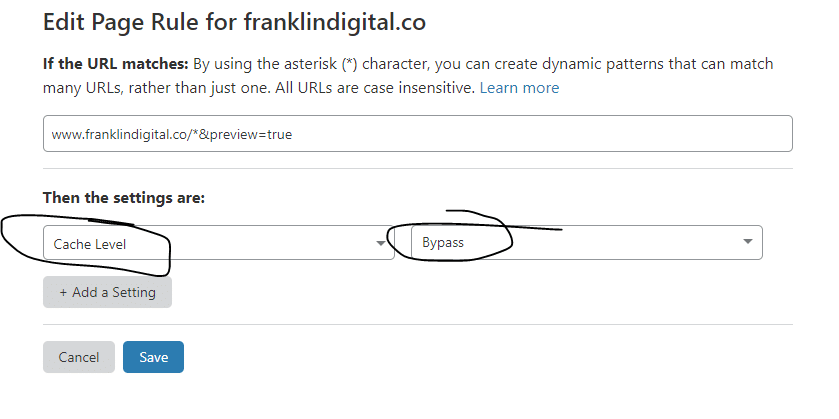
From there save this rule and move onto the next one!
yoursite.com/wp-admin*
This page rule applies the exact same Bypass Cache settings as we just setup for our preview URLs – except in this case it prevents caching of your entire wp-admin area which most certainly you do not want cached at all. For this rule also select “Cache Level” and “Bypass”
yoursite.com/*
Here is where the magic happens – we’ll be implementing two settings for this URL which encompasses all of the publically available URLs on your site. The asterisk denotes the wildcard in this case.
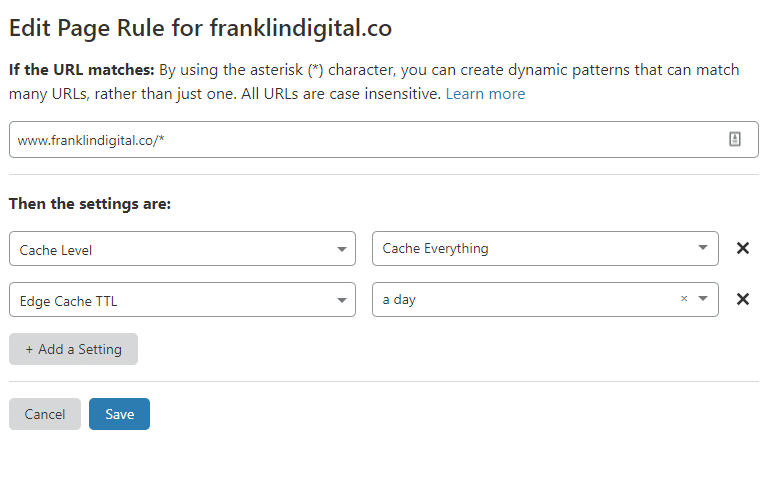
For this page rule, you’ll be setting up the following rules:
- Cache Level: Cache Everything
- Edge Cache TTL: a day
The “Cache Level” turns on full caching for all of those URLs. The “Edge Cache TTL” is a setting that controls how long CloudFlare’s edge servers will cache your content. Enabling this allows Cloudflare to override your existing headers in place from your server, and allow Cloudflare to cache even more content than normal – decreasing the load on your server and your TTFB time.
Enable and save all of these rules – and then make sure to clear your main cache in Cloudflare and wait for a while for everything to get cached.
Seeing Results from This Improvement
While no stack is going to see the same results as us, implementing these page rules decreased our TTFB by almost 2.5 seconds – which is an absolutely huge improvement for page load times.

For your results run a before/after so you can get an idea of the improvement your site can see. These types of page load times are increasingly becoming important to SEOs as Google has recently announced that Core Vitals will soon be a ranking factor. Best get ahead of it now!
If you’ve found any other tricks to improve your TTFB or have some questions about the process feel free to ask!
Get Your Free SEO AUDIT
no B.S. - just actionable next steps
Hear it from our biggest fans
proud to have worked with




0 Comments